Overview
- The customer journey
- The customer journey map
- Why create a customer journey map
- How to create a customer journey map
- Elements of a customer journey map
- 6 Tips for advanced journey mappers
- Additional learning resources
- Key take aways
What is the customer journey?
The customer journey is the process that a person goes through when interacting with a brand, product, or service, from their initial awareness and consideration to the eventual purchase and post-purchase experience. It encompasses all steps a customer has, both online and offline, both with and without interacting with a brand, and is vital for understanding their behavior, needs, and satisfaction levels. Analyzing the customer journey helps businesses optimize their strategies to create a seamless and satisfying experience that fosters customer loyalty.
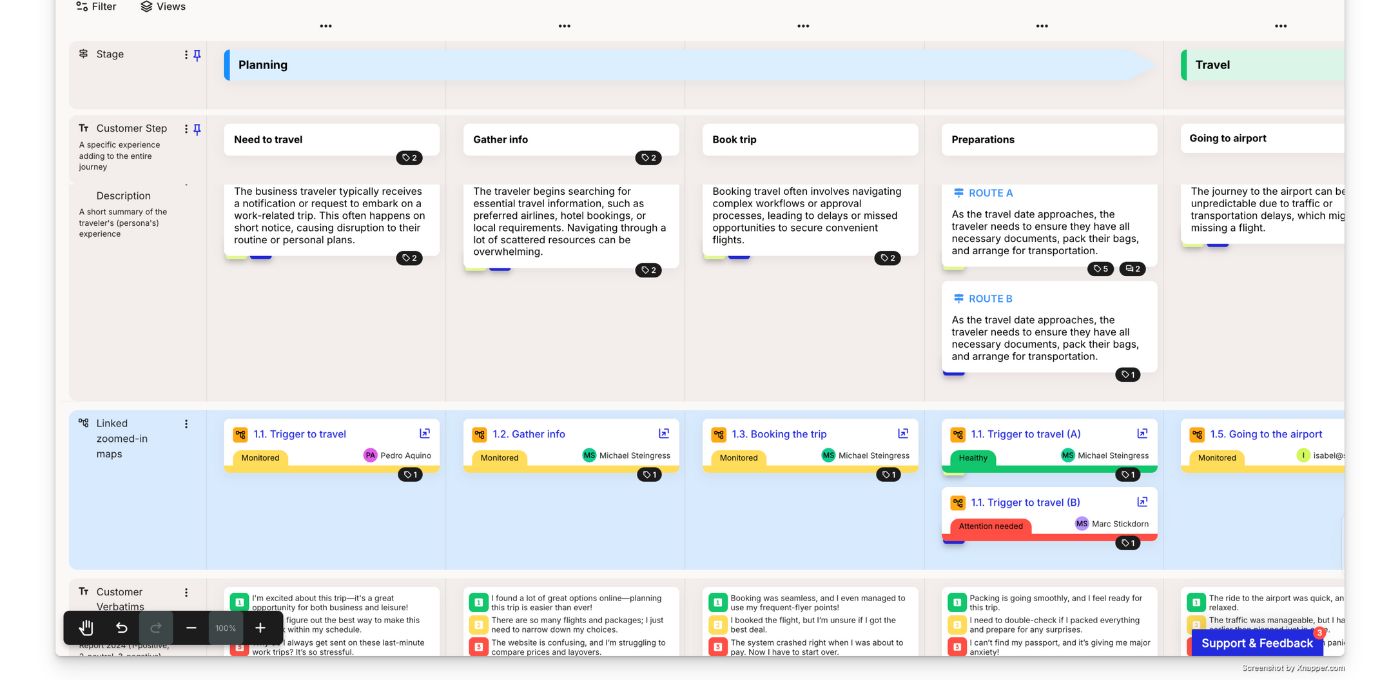
A few examples of customer journeys are:
- Experience of a website or an app
- Employee experience during the recruitment process
- Journey of a patient admitted to a hospital
- Customer experience in different sectors, like banking, tourism, education, etc.
Sometimes the customer journey is called user journey; basically it's the same concept, but with a different focus persona: a user persona focuses on a person who is actually using a service or product. This might differ from a person buying, following, or owning a product or service. Thus, most concepts from the customer journey are valid for other focus personas too.
➡️ Tip: Here's a in-depth guide on user journey mapping that is focusing on digital user journeys.
What is a customer journey map?
Let's start with a clear definition:
A customer journey map (CJM) is a visualization of the sequence of steps a person takes when interacting with your company, product, or service. It includes evidences of all touchpoints along the customer journey, from awareness through purchase and post-purchase stages. A customer journey map typically includes information like interactions with channels of communication (social media, live chat, emails, etc.) and customer satisfaction evaluation for each experience.
A customer journey map is like a movie: It tells the story of a protagonist in a sequence of scenes. It can illustrate the experiences of different people.
Sometimes you will also hear other terms describing the concept: customer journey map, user journey map, customer experience map, or consumer journey map – basically it's all the same kind of visualization, just with a different focus on a different actor.
This is an example of a customer/user journey map:
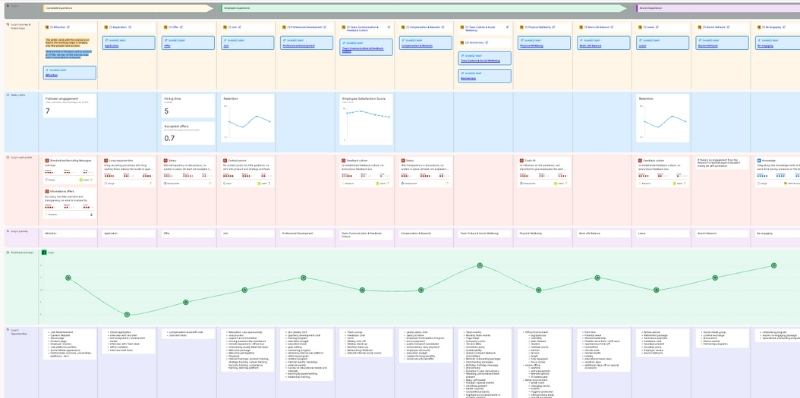
The goal is to understand what they experience along the way, and to ensure a seamless experience at all touchpoints and across channels. A journey map helps to ensure every customer (or any other actor) is going through your service journey over the path that you have prepared for them. Furthermore it also helps to align the contribution of stakeholders that help to make the journey happen.
... and what is customer journey mapping?
Customer journey mapping is the process of creating a journey map of a customer or any other main actor. It involves creating a visual representation of the customer's experience, which helps you to understand their interactions with a product, service, or brand.
Customer journey mapping helps businesses understand the customer’s perspective. These maps put the customer needs at the center of the design & innovation process, which makes them strong tools for a human-centered approach.
Nowadays, customer/user journey mapping is more and more involved as an ongoing customer journey management process: it's used to orchestrate improvements in customer satisfaction.
Why create a customer journey map?
Let’s imagine a company is struggling with retaining customers, which is crucial for the company’s growth.
Mapping out the SaaS customers' journeys could help the company identify the small and big moments that influence customers’ decisions and get to the bottom of the problem. For instance, customers may churn because of poor onboarding, bad web interface or low-quality support.
There are manifold business cases for customer journey mapping – let's summarize a few possible reasons to start with journey mapping.
When to start with customer journey mapping?
- When being confronted with low customer satisfaction, to understand the current flaws
- When creating product roadmaps, to successfully prioritize features
- When founding new businesses, to make sure you're truly meeting customer needs
- When working on service blueprints, to balance it out with a customer-centered perspective
As we see, customer journey mapping provides value and benefits in many different situations. Therefore, almost every moment is right to start with journey mapping –it will always help you to better understand the current-state experience.
➡️ Tip: Allocate sufficient resources to journey mapping; especially if you make it a team project, make sure everybody can invest a decent amount of time.
What's the ROI of customer journey mapping – is it worth it?
Customer journey mapping doesn’t only matter from the revenue perspective for business or e-commerce – it is relevant in various niches, like healthcare or civil service.
- Companies with a customer experience mindset drive revenue 4-8% higher than the rest of their industries
- 81% of companies view user experience as a competitive differentiator
- 96% of customers say customer service is important in their choice of loyalty to a brand
- Brands with superior customer experience bring in 5.7 times more revenue than competitors that lag in customer experience
- Companies with initiatives to improve their customer experience see employee engagement increase by 20% on average
Check out a larger collection of CX statistics on Forbes, or read a detailed article on the ROI of journey management.
How to create a customer journey map?
Customer journey maps vary depending on their goal, context, detail, etc. User journeys can cover omnichannel journeys or focus on a single step. Regardless of their size or design, good journey maps are made up of similar components.
Here’s an example of what a journey map can look like:
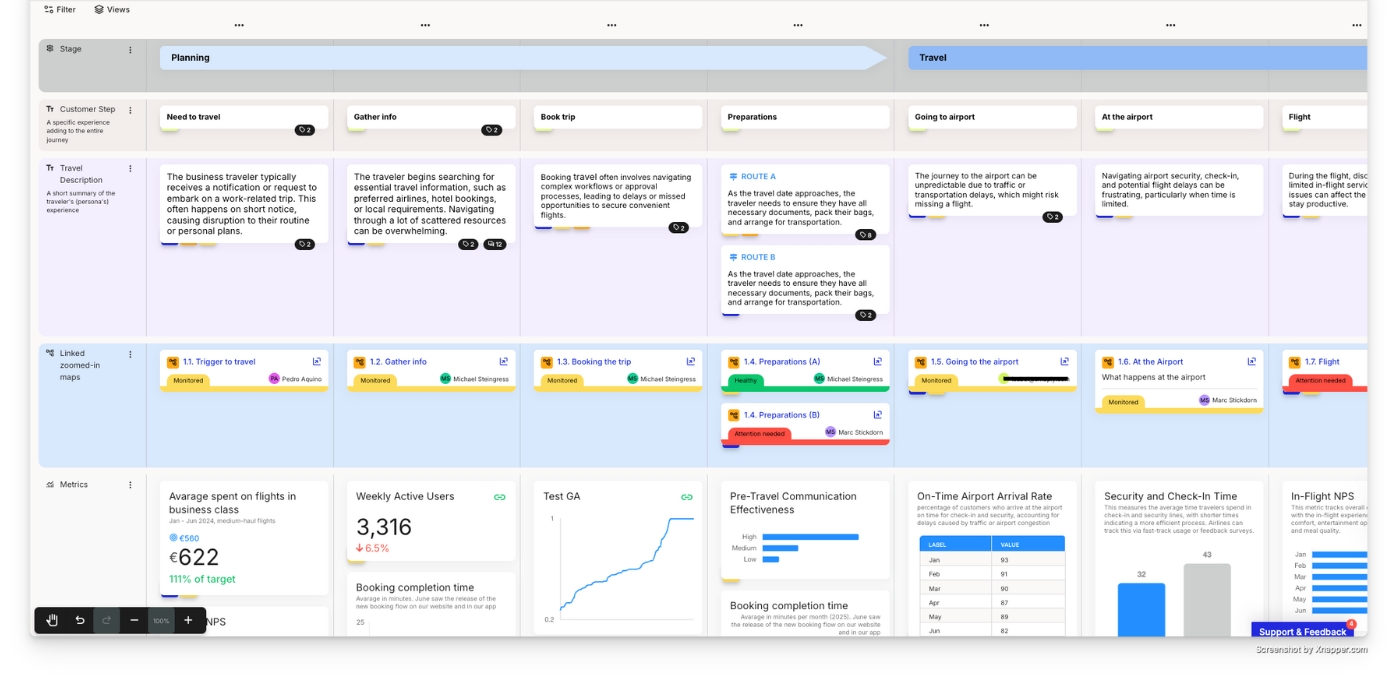
For more customer/user journey examples, have a look at our example journey map collection.
Step 1: Define the scope of your journey map
When you’re creating a customer journey map, the first and most important step is to define its scale and scope based on your journey challenge.
For example, high-level journey maps provide an overview of an end-to-end experience. You can use them to plan your research, manage multiple projects and teams, or to align different detailed journeys.
If you want to focus on one step of a higher-level journey, build a more detailed journey map. If your goal is to work on a specific idea or a challenge, concentrate on customer needs and how your idea connects with them.
In other words, the first step to making an effective customer journey map is to decide how far you want to zoom in or out of the experience you are illustrating.
If you’re unsure how detailed a journey map should be and how many steps it should include, start with a high-level journey map to get an overview of the entire journey.
– Marc Stickdorn, Co-Founder & CEO of Smaply
After that, it’s easier to zoom in on single steps of a journey. Just ask yourself: What happens in step X? How does the persona actually get there?
Step 2: Choose a persona to focus on
A journey map is usually based on a specifying persona that represents the behavioral traits and needs of your average customer. Personas are fictional characters that represent groups of people with similar behavioral patterns, needs, interests, and goals. Developing personas provides a deeper understanding of your customers and helps create a realistic journey map. Furthermore, using personas ensures you put your customer’s perspective at the center and create empathy for your customer.

Sometimes it makes sense to combine various perspectives on one map – this is where multi-persona maps come into the game. For example, you can compare the experiences of different customer groups or map out employee experience while at the same time mapping the customer’s experience.
I recommend to use core personas during the journey map design process but to test it with extreme cases because different sets of skills and expectations will have high impact on the actual experience. For example, usually elderly people experience digital services much different from young folks
– Marc Stickdorn, Co-Founder & CEO of Smaply

The persona strongly influences the overall outcome of mapping customer journeys. So take your time to define and understand who you’re making the map for and why. Start with a basic outline that includes age, gender, education, occupation, income, and location. Next add psychological criteria, such as attitudes and aspirations.
Here's a more detailed guide on creating a persona.
➡️ Tip: If you’re building a journey map or creating a persona with pen and paper, the results are often forgotten or neglected. The reason is simple — it is too difficult to visualize them and make changes to them afterward.
You can now convert your offline notes into an online customer journey map and edit it when needed. This way, teams have presentable exports within a few minutes and can collaborate in a digital environment.
You can use this to compare different experiences, to understand pain points of different customer groups, of different segments. It’s also interesting to see how two personas interact with each other.
– Marc Stickdorn, Co-Founder & CEO of Smaply
You can use a free persona generator and connect it to your organization’s customer journey map.
➡️ Tip: Learn more about embedding personas in organizations.
Step 3: Collect data and insights
Researching customer experience is a crucial phase in the customer journey mapping process. It involves gathering a wealth of information from various sources, such as customer feedback, surveys, analytics, and market research, to gain a deep understanding of customer behaviors, preferences, pain points, and motivations.
This data provides the foundation upon which the customer journey map is built, allowing businesses to identify key touchpoints, moments of delight, and areas where improvements are needed.
Through the collection of relevant and accurate data, organizations can make informed decisions, tailor their strategies, and ultimately create a more personalized and satisfying customer experience that resonates with their audience.

Step 4: Create the customer journey map
Now it's time to actually build the customer journey map; depending on your team setup, you can do so either alone with a simple pen-and-paper template, or invite your team to a customer journey workshop.
Creating a journey map describes the activity of visualizing all the CX data that you have gathered in a well-structured map. A common visualization of a customer journey map is in the form of a matrix:
- Each step, or experience, gets its own column.
- Row, or lanes are optional elements that enhance the journey map. They offer room for extra information about backend and frontend activities.
Here are some common lanes you can add to the map you’re building:
Steps and touchpoints
Steps in a journey map represent a customer's activities along their journey to reach a goal (e.g. a purchase).
To be more precise, we usually differentiate between steps and touchpoints: The difference between steps and touchpoints is that a touchpoint is a direct interaction with a brand, whereas a step includes every experience a customer has along the journey.
Steps describe every experience a customer has along the journey. Steps can include customers doing research, experiencing waiting time or getting to the store by bus. So you can’t always influence every step that your customer experiences.
Touchpoints refer to interactions between a customer and a company that either strengthen or weaken their trust. These interactions can take various forms, such as reading an ad, reaching out to customer service, or using a product. Touchpoints encompass all experiences that the customer or main persona encounters, whether they involve human interaction, machines, or digital interfaces.
Hence, every touchpoint is a step, but not every step is a touchpoint. So don’t forget to add both types of interactions to your journey map. You can’t directly influence every step; but you can influence every touchpoint.
When you create a customer journey map, describe each step/touchpoint in one horizontal row. Give each one a short title to sum up your persona’s experience and activity.
➡️ Tip: Before you start adding touchpoints to your map, decide what the key part of the experience is. Then ask yourself what happens before and after this experience. It will help you plan out each touchpoint.
➡️ Tip: Avoid creating journey maps with too many steps – you’ll likely lose focus then. In the beginning, try not to exceed 20 steps per journey.
Stages
Stages divide the customer journey timeline and help structure it. For example, a simple journey map can consist of three stages: pre-service, service, and post-service. A more complex map can include further detailed stages, such as gathering information, buying, setting up, using, support, etc.
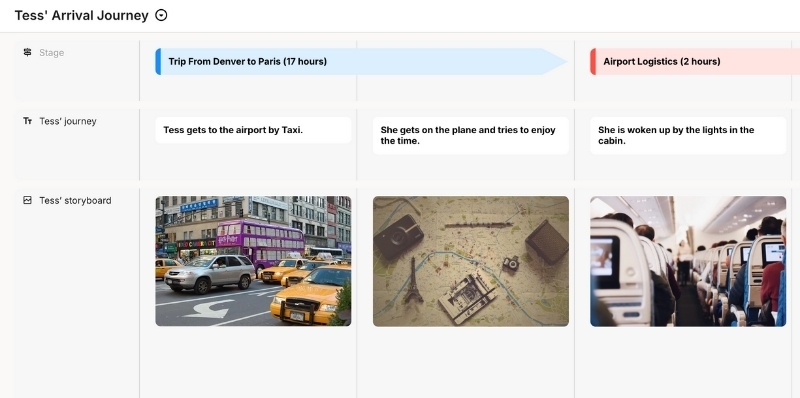
The example journey map above shows the five steps for Tess in her favorite café. We categorized them into two stages: ‘Pre-coffee at home’ and ‘Heading to Café Bean’.
Here are some examples of customer/user journey map stages in different industries:
- Travel: research, booking, arrival, stay, return
- Restaurant: arrival, ordering, meal, payment, leaving
- Online shopping: research, evaluation, ordering, delivery, returns
- Airport: pre-boarding, boarding, flight, exit
Storyboards
A storyboard is a visual representation that depicts the various experiences. Storyboarding offers more than just visualization and empathy-building. By representing specific moments, it allows detailed exploration of each scene, offering diverse perspectives on the persona's journey and facilitating the creation process. Finally it also aids in efficiently navigating extensive customer journey maps.
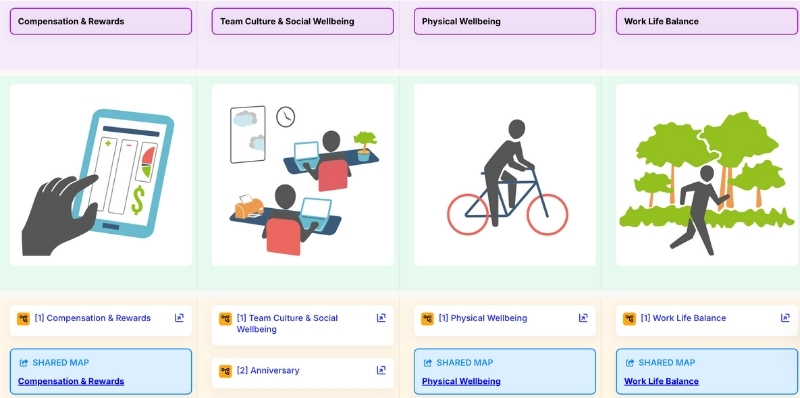
A storyboard is really valuable for a customer journey map:
- It visualizes the situation holistically
- It provides context for each situation
- It gives a comprehensive overview of the whole journey
- It makes it easier to empathize with the persona
- It makes large maps easy to navigate
On a storyboard, you can use the following kinds of visuals:
- icons
- photos of real-life situations
- screenshots of interfaces
- scribbles visualizing specific situations
You can even sometimes create a comprehensive and engaging customer journey map with just steps and a storyboard.
Text and descriptions
You can also elaborate on each step of your CJM with text descriptions. Text lanes can describe the persona’s pain points or include verbatim customer quotes to articulate what they are experiencing.
If needed, you can add additional lanes for user wants and needs, wishes, your own ideas, KPIs, etc.
When you create a customer journey map, extra information allows you to describe the customer's experience better or to add other types of information, such as:
- Pain points
- Needs
- Jobs to be done
- KPIs
- Thinking and feeling
- Ideas for improvement
- Key learnings
- Opportunities
- .... and many more
Channels of communication
Your customers interact with your company via different channels, switching between online and offline channels, using different devices and media. Journey mapping can help you get an overview on these channels: Adding channel lanes to your customer journey map shows how people interact with your brand or product. It's especially useful for high-level maps to fill in gaps in cross-channel experiences.
The channel lane gives you a comprehensive overview of journey maps, especially high-level ones. Specifying the channel (e.g. face-to-face, telephone, online, etc.) at each step informs stakeholders about cross-channel experiences and potential gaps in cross-channel CX.

Compare experiences between different channels and ensure you align them online and offline. Remember that your customers see your company as one entity so you might want to create an omnichannel customer journey map. For example, buying a ticket online is different from buying it in person.
➡️ Tip: even if you're providing a digital service – don't forget about non-digital channels!
Emotional journey
The emotional journey is the core of your map. An emotional journey reveals obvious gaps within a persona’s level of satisfaction at each step. You can use a simple 5-point Likert scale from very negative (-2) to neutral (0) to very positive (+2) to describe a persona’s experience.

For example, a standard customer service might be neutral but a very kind service can result in high satisfaction and add 1 or 2 points on a scale.
Dramatic arc
The dramatic arc is a graph that shows a persona’s engagement or the importance of a particular step. It is useful to analyze the existing experience as well as map out a future concept or a desired engagement.
Dramatic arcs help you to reflect on the pace and rhythm of an experience. You can use them to analyze an existing experience or to plan a future concept along a desired dramatic arc.
You can again use a 5-point scale – this time from very low (+1) to very high (+5).

Remember though that there are moments of thrill (high engagement) and chill (low engagement), and both can be either positive or negative.
How so?
A low dramatic arc when purchasing a few standard pencils is acceptable – but a low dramatic arc when sitting on a rollercoaster is definitely not.
Marc Stickdorn, co-founder and CEO of Smaply
In summary, the more details (lanes) you add, the more realistic is the map you create. When you arrange all the data, focus on the right content and make the format easy to understand for everyone involved. The choice of lanes you use in your map depends on the type of journey map you create and the scope of your project.
➡️ Tip: customize your journey map according to your audience's interests!
There’s no right or wrong way to create a map, but customer journey map tools like Smaply help you organize it for free. It’s important to tailor it to your product and business.
Optimize customer journey maps: 6 tips for great insights
To optimize your first drafts of journey maps, we recommend the following tips and tricks:
1. Use customer journey metrics and data
You should never base a decision on assumptions, and therefore you need to back up your journey maps with real data. Current-state customer experience measures will give you a solid foundation for all the decisions that follow.
Mix qualitative and quantitative approaches when designing journey maps!
On the one hand, you can use customer journey metrics to track and evaluate the customer experience performance. A few common customer journey metrics are:
- Customer lifetime value
- Customer acquisition cost
- Customer satisfaction scores
- Conversion rates
- Return rates
Beyond these quantitative customer journey metrics, you can also use qualitative journey insights to better understand your customer experience. Examples for such qualitative data are:
- Customer interview recordings and transcripts
- Video documentations
- Artifacts
- Insights gained from observations
These insights from experience research will make your customer journey map a living boundary object with relevant information for many different people/departments. Furthermore, this will make the journey map a hub for your CX insights.
2. Look at backstage activities
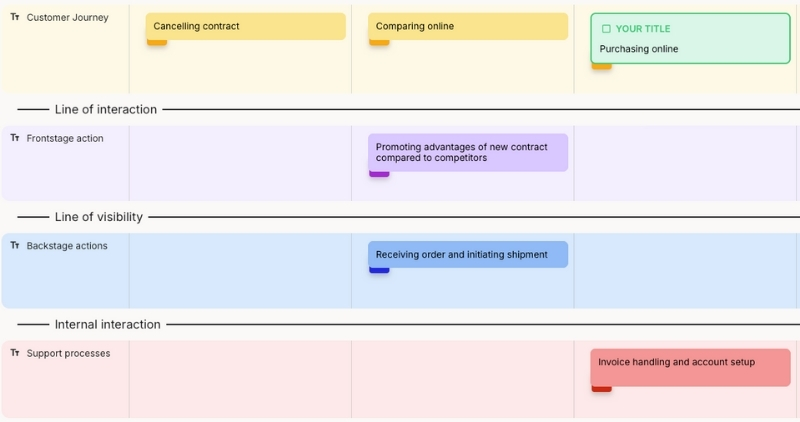
A journey map should always be based on the persona’s experience. However, that does not mean you should not consider backstage processes that influence the journey.
A backstage lane shows internal activities that are mostly invisible to the customer. These internal activities are however crucial in delivering the product or service.
They also illustrate the resources an organization needs to invest in to maintain a certain quality of service.
Let's take an example from digital customer service: a customer is calling an organization’s service center. The customer might only experience personal interaction with the agent, and how well a problem is solved. The organization, however, will have several other steps while they handle the call. Steps like: the digital client database, the logistics department, an external transport supplier, and so forth.
By the way, one common type of backstage lanes you might have heard of are service blueprints.
3. Visualize the customer journey network and create a journey management system
Including planned and ongoing projects that impact the customer experience helps you to manage the overall experience. As a first step it is useful to create a journey map repository – starting on a high level and then breaking the customer journey down to more detailed maps.
Effective customer journey management is vital for businesses to remain competitive and relevant in today's market. It helps to optimize every step of the customer journey and thus ensuring customer satisfaction, building brand loyalty, and driving revenue growth.
4. Collaborate on journey maps
Don’t be the lone wolf working on the journey map!
First, do your research. Your customers, users, citizens, patients, and clients can help you at every step of your project, contribute their knowledge, and share their perspectives.
Also, invite your immediate team to give feedback on your journey map. The members of your broader team are a source of high-quality insights. Ask the customer service team and sales representatives about their opinion, talk to the IT and legal departments, and inquire about the need for specific processes. Maybe they can be adapted to make your customer’s life easier.
You can also invite external and internal stakeholders to pen-and-paper design thinking workshops.
Furthermore, presenting journey maps to each other – to your team, boss, client – helps everybody wrap their heads around the topic.
5. Create journey maps for long-term usage
Don’t just create your customer journey map and forget about it afterwards. Customer expectations change overtime and therefore effective journey mapping requires updating maps on a regular basis.
An insightful journey map requires reliable data and regular maintenance. Iterate on them, and make them a living document! By continuously identifying the most crucial pain points, and fixing them you will be a step ahead of your competition.
Check out this article about current-state and future-state journey maps to learn more about how to build maps with such a focus.
Make use of journey maps you’ve created earlier to feed into the journey map you’re currently working on, and use your journey map repository to build future projects upon your insights from other projects. The more knowledge you can build upon from other projects, and other journey maps, the easier and more insightful future journey maps will be.
For this sake, it’s best practice to use software like Smaply to digitize journey maps; this way, teams can easily access and update the maps.
6. Make your journey visually appealing
There are numerous ways to make a professional journey map, it very much depends on your specific use case. Using visual clues to make a journey map more comprehensible however, is always recommendable.
Illustrate processes by using pictograms
Not all journeys are linear, and process visualizations help viewers to grasp the concept of a journey that has multiple options, or one that goes in loops. For more information on this also check out our article on branching of journey maps

Stress the emotions of a persona through colors
Emotions are important to understand in your customer’s journey, and our brains can quickly grasp the meaning of a color. Therefore, it’s recommendable to stress the emotions of a person through colors.

Show stakeholders' influence on your journey map
Stakeholders play a crucial role in a journey map, don’t forget that. Make dependencies obvious, because smooth collaboration is essential to deliver seamless customer experience.
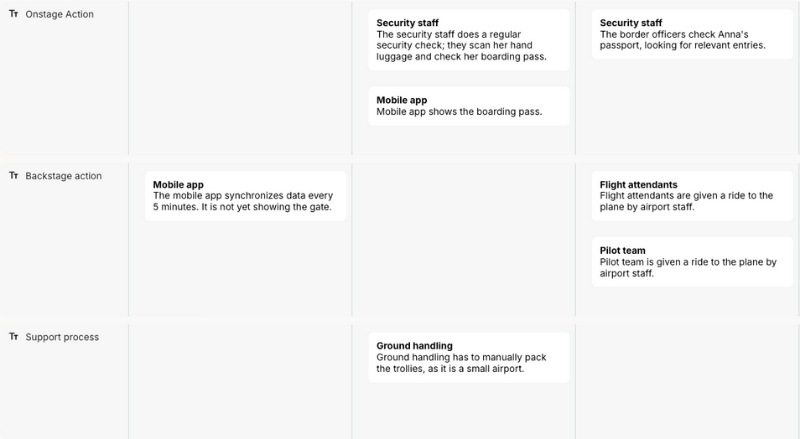
In general, knowing the basics of stakeholder mapping and combining the insights of the two tools is highly recommended for great journey maps.
Additional learning resources
Cheat sheet
This cheat sheet summarizes the most important details, or lanes, of a journey map. For example, channel lane, storyboards, dramatic arc, and more. There are many more details you can add to a journey map, always keep your individual case in mind. Use the cheat sheet as an introduction to the topic – or as a reminder to put on your desk.

Download the cheat sheet (free)
Learning cards
These journey mapping learning cards are helpful reminders of the aspects to consider when analyzing a journey map, or when you're trying to express a journey map you've played a role in creating.
There are different categories or aspects and in some cases multiple cards for each category.
Use them as you like – print them, bring them to a workshop, keep them by your desk, or share them with a friend.
Templates
If you want to create your first customer journey map with pen and paper, we've got you covered: we've prepared a printout for you to use for your first draft. Of course you can also create your customer journey map online with Smaply.
Get the pen-and-paper template
Example journeys
If you are a visual learner, we've prepared a large collection of helpful journey map examples.
Customer journey mapping case studies
There’s no service field where journey mapping isn’t relevant – that’s why the variety of projects is huge. Here are a few great case studies from different sectors that show how journey maps helped improve people's experiences in different industries and contexts.
Journey mapping in telecommunications
Case study: How Deutsche Telekom embedded journey mapping into the organization
The company promoted internal CX navigators to take care of shifting the culture. A bunch of willing employees, empowered with new tools and mindsets, supported from the top down, helped infuse the company culture with service design.
Journey mapping in healthcare and social services
Three case studies about journey mapping that resulted in social impact
In this article we showcase some of these great examples where service design tools and approaches are being used to create positive ripples that impact individuals, communities, and even whole countries. It covers three case studies from New Zealand, the Netherlands and Zambia.
Journey mapping in public services
Case study: How Chile’s government improved citizen and employee experience.
This case shows how a consultancy agency together with a local governmental institution in Chile worked to improve the customer & employee experience.
By including both the internal and external view, they succeeded in visualizing service gaps within the user journeys. This allowed them to implement change within the organization.
For more inspiration, check out our collection of CX case studies.
Key take aways
Creating a customer journey map is essential if you care about your customers' experience.
- A customer journey map visually represents customer journeys and tells the story of customers' experiences with your brand across different channels and touchpoints.
- Customer journey maps are important if you'd like to address low customer satisfaction scores because they shift the focus from processes to customers.
- Before you start with customer journey mapping, think of a persona you want to design for.
- Customer journey maps usually consist of elements such as stages, steps, and extra lanes that divide the timeline and describe various interactions the persona has with your brand; however each journey map is different and depends on the use case.
If you want to create a customer journey map, these are the steps that you can follow:
And here are some elements (lanes) that compose your customer journey map:
- Storyboard
- Text and description
- Communication channels
- Emotional values
- Dramatic arc
Tools like Smaply can simplify the process, offering a user-friendly interface and guidance throughout.
Feeling ready to get your hands dirty?
Start creating your own journey maps with Smaply! This tool will guide you through the process of journey map creation. Besides that, you can also create personas and stakeholder maps to back up your work. It's free, forever.


